food


My favorite quote about eating Korean food (which is famously hot – in both senses of the word)
“If I don’t sweat, how do I know I’ve eaten?”

Hotness in Korean food is so important that we have a separate word for spicy hot and temperature hot – and they are never confused.

Chad, Christian, and I had an unexpectedly fun day last weekend.
We checked out the OC Market, which a huge weekend swap meet in the parking lot of where the OC Fair takes place every summer. Entry is $2 and you can find anything from knock-off sunglasses to discount bottles of your favorite shampoo. There are also lots of food vendors plying you with samples and several conventionally-grown produce stands where you can walk off with 25 pounds of produce for under $10. No joke. I could barely carry our groceries to the car.

Then we cruised over to H Mart, the nearby Korean market to eat at the little hot pot place just inside the front of the market. It’s called Bibigo and it turned out to be an economical way to get a Korean food fix.

The hot pots actually sit directly on top of the flaming burners until just before they are filled, so when your dish arrives, it is not only spicy hot, but bubbling HEAT hot. YUM.

if you eat like a Roman, you’ll spend a lot less money.
n.b. ~35 Baht equals 1 US dollar

Five meals “out” in three days (all were carry-out or in the case of Italian food, delivered to the door):

30 B Khao Man Guy (Chicken, cucumbers, and rice cooked in chicken broth) This is something we pick up for the kids several times a week for lunch.

40B Khao Mu Daeng (Rice with red pork, hard-boiled egg, and slices of sausage – comes with spicy sauce)

40B Khao San (Chicken, fried and regular noodles in a SPICY peanut sauce – comes with garlic, onions, cabbage, and other stuff for garnish) This is a northern specialty and is served right at a cute restaurant at the head of Sue’s street.

30B Guy Yan (Grilled Chicken – on an open BBQ in front of the restaurant. Served with sweet sauce. Usually served with somtum and sticky rice) Another kid favorite, but I always end up eating it too.

280B Pasta Puttenesca from the Italian restaurant around the corner.

Mangosteen, also known as mankuut, comes into season around Noi naa's birthday. I first fell in love with it when I came for her birth.


So far, and mind you, we are only halfway through day four in Thailand, we have eaten mangosteen, lychee, pineapple, guava, green mango, regular ripe mango, apple, watermelon, jackfruit, sham-poo (like a small pear), dragon fruit, and rambutan.

All fresh and kilos and kilos of the stuff.

Part of it may be because we are spending a lot of time lounging around the house because of 1) record heat 2) still jetlagging 3) political protesting may be escalating starting today (although we feel very removed and safe here in this area).

Dragonfruit is aptly named. It comes with white flesh, or the wilder variety, which has crimson flesh.


A bowl of dragonfruit a day keeps the constipation away.


P.S. Last summer’s post on Thailand fruit here.

To change things up a bit in the kitchen, I also love to dip into an issue of Cooks Illustrated, especially now that I’ve discovered that my local library has a subscription (grrr – last two times though somebody has had every single back issue checked out!).

Last month, at Costco, I spotted a recipe for slow cooker meatballs in the current issue. I didn’t buy the issue, just reread the ingredient list until it was somewhat lodged in my brain. Of course, by the time I was actually ready to make the meatballs I wanted to review the recipe, but sadly the current issue at Costco had already been replaced with this month’s issue, and it was checked out at the library.

So, I did that flying by the seat of my pants thing and it worked out okay.

I LOVED the way my meatballs turned out and I’m really looking forward to a meatball sub for lunch (with a slice of smoked gouda).

Here’s the general idea for

SLOW COOKER MEATBALLS

1 # grass-fed ground beef

3 spicy Italian sausages squeezed out their casings (I believe the recipe called for sweet Italian, but I generally go for savory over sweet)

2 eggs

1 c bread crumbs (I used panko, because I happened to have them on hand)

1 c parsley, chopped fine (from another meatball recipe I’ve used)

1 c shredded mozzerella (may have called for parmesan)

salt and pepper to taste

Sauce: 3 large cans plum tomatoes, lots of pressed garlic, large bunch of basil chopped, one can tomato paste

1. Add the plum tomatoes to the crock pot and whizz it up with an immersion blender. Add up to one head of pressed garlic and one bunch of  basil, chopped. Turn the crock pot on. Salt and pepper to taste.

2. Mix meatball ingredients well by hand. Shape into meatballs.

3. Broil meatballs to render the fat.

4. Gently drop the meatballs into the sauce.

5. Let it simmer the rest of the day and serve over spaghetti with garlic toast.

You’ll be happy you did it.

This meal has already provided lunch (x6); plus, I used the sauce last night for pizza, and the remaining meatballs will be my sub for lunch.

So much for having some left over to freeze.

The way my friend Sierra responded when I tried to show her this book mirrored my own reluctance to take on yet another fad – and then my quick acceptance and now championing of the book by Jeff Hertzberg and Zoe Francois, Artisan Bread in Five Minutes a Day.

It went something like this:

Sierra, you have to check out this book.

Aren’t you going to blog about it? I’ll try it after you blog about it.

You really get fresh baked bread every day for hardly any work…

Can you summarize?

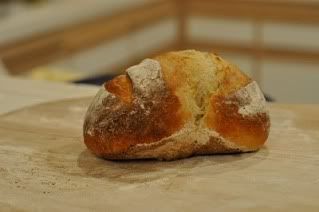
Just look at the recipe – it’s two pages! Amazing bread! You should see the picture at Jaimie’s blog! I thought it was a picture from the book, but it was HER bread – her first loaf!

OK, let me see that… (pause) … Can I borrow this for one night?

The next day Sierra showed up at the park with fresh-baked artisan bread. And that’s about how it goes.

The basic premise is to mix, not knead, enough dough for several (4-8) loaves of bread and store it in the refrigerator. The dough is very wet and loose, which allows the gluten to align itself properly without kneading with the passage of enough time. When you want a loaf, you cut off a bit, “cloak” it, let it rise and bake. It really only takes five minutes – and we’ve had fresh bread with dinner ever since I put my first batch of dough in the fridge.

Now I love kneading bread, but the bare truth is, that I haven’t done it in years. Although I love fresh-baked bread, the time factor leans heavily in favor of my bread machine. Also, I’ve never made bread that looked so heavenly like European artisanal bread before I tried the recipe in this book.

I am a convert and yes, I am going to share some of the zealous buzz with you – right now.

While I recommend buying and reading this book for more explicit directions, here are enough guidelines for somebody who has already read the book to recreate the bread magic.

1. In a large lidded bowl (I used the ceramic insert of my slow cooker), mix 3 cups warm water, 1 1/2 tablespoons of yeast, and 1 1/2 tablespoons coarse salt.

2. Mix in 6 1/2 cups flour, using a scoop-and-sweep method.

3. Allow to rise for at least 2 hours or until it begins to collapse.

4. Cover (not airtight) and store in fridge.

5. Before starting to make dinner, throw flour on top of the dough and cut off a grapefruit ball size lump of dough. Cloak it (with well-floured hands – stretch the surface of the dough and tuck underneath itself about 3 times) and put it on a well-floured pizza peel (I used a cutting board).

6. Let it rest for 40 minutes.

7. Begin preheating the oven with a pizza stone, cast iron pan, or cast iron lid already inside. It needs to preheat for at least 20 minutes. An oven thermometer is recommended.

8. Before putting in the bread, slide in a broiler pan with at least one cup of warm water in it into the same oven. That’s for steam.

9. Sprinkle more flour on top of the dough and slash the top a few times.

10. Slide the dough onto the pre-heated pizza stone and bake for 30 minutes.

You won’t believe your eyes.

And the rest of the book is filled with variations on this recipe – including cinnamon buns.

For 8 loaves, remember 6-3-3-13.

6 cups water, 3 T salt, 3T yeast, and 13 cups of flour.

Jaimie's first loaf - her pictures are much better than mine! Click on the pic if you'd like to visit her blog.

Lemons abound!

Not only are they in my CSA basket, all over the farmer’s market, but friends are giving us lemons from their trees.

So, that means nightly lemon-honey tea (juice of one lemon, honey, and hot water), lemon squares (Mark Bittman’s recipe), candied lemon peel (recipe to be posted at a future date) and lots of  Couscous with Cilantro and Lemon Juice. I riffed off the recipe from epicurious.com here and used large couscous upon the suggestion of my sister-in-law. It turned out great – and used a surprisingly amount of cilantro, which I always seem to have lurking in the bottom in one of my veggie drawers. Bella liked it, and so did the wee Murdy. (Husband’s an easy sell – he likes everything I make, so…)

The flavors were bold. It went great with roasted chicken.

Couscous with Cilantro and Lemon

  • 2 tablespoons olive oil
  • 2 garlic cloves, minced (I used 4 cloves or more)
  • 1/2 teaspoon turmeric (I used curry powder – a heaping tsp)
  • 1 2/3 cups water
  • 1 teaspoon finely grated lemon peel (I used more – an entire lemon)
  • 1/2 teaspoon coarse kosher salt
  • 1 1/2 cups plain couscous (I used large pearl, the Israeli kind from TJs)
  • 1/4 cup chopped fresh cilantro (I used way more – almost an entire bunch)
  • 2 tablespoons fresh lemon juice (again, MORE – a whole large lemon)

1. Heat oil in medium saucepan over medium high heat. Add garlic and turmeric; stir 1 minute.

2. Add 1 2/3 cups water, lemon peel, and 1/2 teaspoon coarse salt; bring to boil.

3. Stir in couscous. Cover and simmer according to box – about 15 minutes.

4. When all the water is absorbed, fluff with fork; mix in cilantro and lemon juice.

5. Season with pepper and additional coarse salt, if desired.

Click on the book to go directly to Michael Pollan's website.

Finally finished Michael Pollan’s The Defense of Food (and now well into The Age of Innocence, which I’m reading to keep my daughter company), and I have to say that I didn’t enjoy it nearly as much as I enjoyed The Omnivore’s Dilemma. It is a worthwhile read, but didn’t have the same kind of narrative pull for me.

I found myself impatiently reading the first 100 pages, wanting to skip ahead to the third section where Pollan explains, in detail, what he means by his eater’s manifesto: Eat food. Not too much. Mostly plants.

Even that section wasn’t as exciting as I’d hoped. You know, the whole preaching to the choir business. I already stick to the periphery of the grocery store when shopping, in fact, I avoid shopping at grocery store as much as possible – and try to work around our CSA basket and local Sunday farmer’s market. I did love that the premise of that whole third section was about trying to escape the Western diet. Growing up in an immigrant household, I have a leg up on that one, psychologically at least, because I’d have no problem switching to a full Korean diet anytime.

Good tips I did glean:

  • Avoid food products containing ingredients that are a) unfamiliar b) unpronounceable c) more than five in number (good one!) or that include d) high-fructose corn syrup (oh no! can I really pass on a free Coke from the costco food court?)
  • Eat mostly plants, especially leaves. – This is a hard one for me, but is one that I will really work on in 2010.
  • If you have the space, buy a freezer. – More on CSA chicken and grass-fed beef in future posts.
  • Pay more, eat less. – LOVE THIS CONCEPT. Now I just need to sell it to my husband… Also love the stats: “In 1960 Americans spent 17.5% of their income on food and 5.2% of national income on health care. Since then, those numbers have flipped: Spending on food has fallen to 9.9%, while spending on health care has climbed to 16% of national income.” Pollan’s point? You don’t get healthy by eating cheap food or WE PAY FOR CHEAP FOOD BY SACRIFICING OUR HEALTH.

Believe it or not, Sierra actually burned the first candied lemons and had to do them AGAIN the next morning. What a hero she is.

I never even knew that candying fruit was something you could do at home...

Wheee-ew.

Just having my first day “at home” (which included going to a parade that was canceled due to the unrelenting downpour and local errands), after a couple weeks of nonstop holiday activity. And our holiday guests haven’t started arriving yet!

Last week, Sierra and I made homemade fruitcake; a process that takes the better part of a day and lots of upper body strength. The recipe was previously posted here.

Sierra was adverse to using the candied fruit from the grocery store that I’ve used in the past, so she candied her own orange peel and lemon peel (to replace the citron), candied her own cherries (organic frozen), and we used dried organic pineapple from Whole Foods. Needless to say, the fruitcake this year is STELLAR.

The whole process of making fruitcake making always takes longer than I remember, because there are things involved that I don’t normally do – like grating three entire nutmegs and sifting five cups of flour. All the ingredients get dumped into a large roasting pan (my largest one I use for the turkey was barely large enough), and then once it’s in the oven, it gets pulled out every 10-15 minutes to get stirred – this goes on for several hours. The pan is HOT and HEAVY (and SMELLS HEAVENLY) and we had four kidlets running and screaming through the house. Every time the timer went off we had to check the location of each child and then lift the pan up to the counter to stir (with lots of grunting).

To stir, you need a very very strong trowel-like tool. You stir it so that it cooks evenly, I guess. And you cook the whole mess until the egg stops stringing – which didn’t make sense to me until I stirred the fruitcake for myself – then it was obvious.

In our snatches of time between stirring, we made a few stocking gifts: fabric luggage tags! I can’t wait to make more. I used the pattern from skiptomylou.com and I was directed there via a tweet from Living Crafts Magazine. If you tweet and enjoy Waldorf-style crafts, I suggest following them. They send several cute ideas a day. (The magazine is wonderful also.)

My first fabric luggage tag ever went to our friend Devana, attached to some fruitcake.

Next Page »